How to Grow Broccoli Microgreens Indoors in Containers
Although increasingly popular among chefs, broccoli microgreens are still difficult to find in the shops. Luckily, growing broccoli microgreens, the young seedlings of the broccoli plant, is very easy, and you don't even need a garden for that! These delicate microgreens can be grown indoors — also in winter — with very little effort and space. With their fine broccoli flavor, broccoli microgreens can be used to enhance salads, sandwiches, and even pasta dishes. These delicate greens also make a beautiful garnish to soups. They are also an excellent source of vitamins, such as vitamin C, and other nutrients such as sulforaphane. The sulforaphane in broccoli microgreens can offer numerous health benefits stemming from its anti-cancer, anti-diabetic, and anti-microbial effects. If you are interested in learning how to grow broccoli microgreens at indoors, read on — the rest of this article provides guidance on how to sow, grow, and harvest juicy and nutritious broccoli microgreens indoors.
- Buy organic broccoli seeds labeled "for use as microgreens" or "for sprouting" in order to ensure they have not been treated with harmful chemicals.
- Like many other seeds in the cabbage family, broccoli seeds will benefit from soaking prior to sowing. Soaking broccoli seeds overnight will speed up the germination process.
- Select a container for your microgreen "plantation". A clean deli container with holes punched in the bottom is ideal for growing microgreens. Next, pour fine-textured potting mix into the container. Scatter broccoli seeds thickly over the moist soil.
- Cover the container with a dark lid that has plenty of small holes to allow good air circulation. Check on the germinating broccoli seeds daily, and moisten the soil when necessary. In order not to wash these little seeds away, it is best to use a spray bottle to gently water the soil.
- After 3 to 4 days, remove the dark lid and pick a bright location for the deli container. A south-facing windowsill where your broccoli microgreens will get plenty of natural sunlight is ideal for growing broccoli microgreens at home. If you don't have a window that provides enough natural sunlight, consider investing in a grow light designed for indoor use.
- Give your emerging broccoli microgreens enough — but not too much — water. The soil should always be moist but never flooded with water. Many indoor gardeners recommend bottom-watering: simply place a tray under the container, and fill the tray with clean water. Let the container stand in the tray for about 45 minutes, or until the soil has absorbed enough water, then remove the tray. You should repeat this regularly to ensure the soil is always moist.
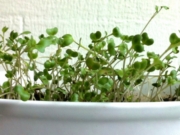
- Once your broccoli microgreens are a few inches tall and have developed small leaves, they are ready for harvest. Broccoli microgreens grow quickly and usually reach their microgreen size in about 10 days. To harvest your crop, use sharp kitchen scissors or a clean knife to cut the microgreens close to the soil. Rinse and use the sturdy seedlings immediately, or store them in a resealable bag in the refrigerator. Packed with nutrients, broccoli microgreens can be used to add a healthy kick to salads. With their fine raw broccoli flavor, they also bring a hint of summer to salads during the dark and cold winter months.
- Once you've eaten your nutrition-packed broccoli microgreens, start a new broccoli microgreen crop, or try growing other microgreens indoors. Other easy-to-grow microgreens and edible seedlings include kohlrabi microgreens, sunflower shoots, snow pea shoots, and garden cress. Slightly more challenging microgreen crops include chervil, basil, parsley, and celery greens.